Showing posts with label DIY. Show all posts

11.18.2011

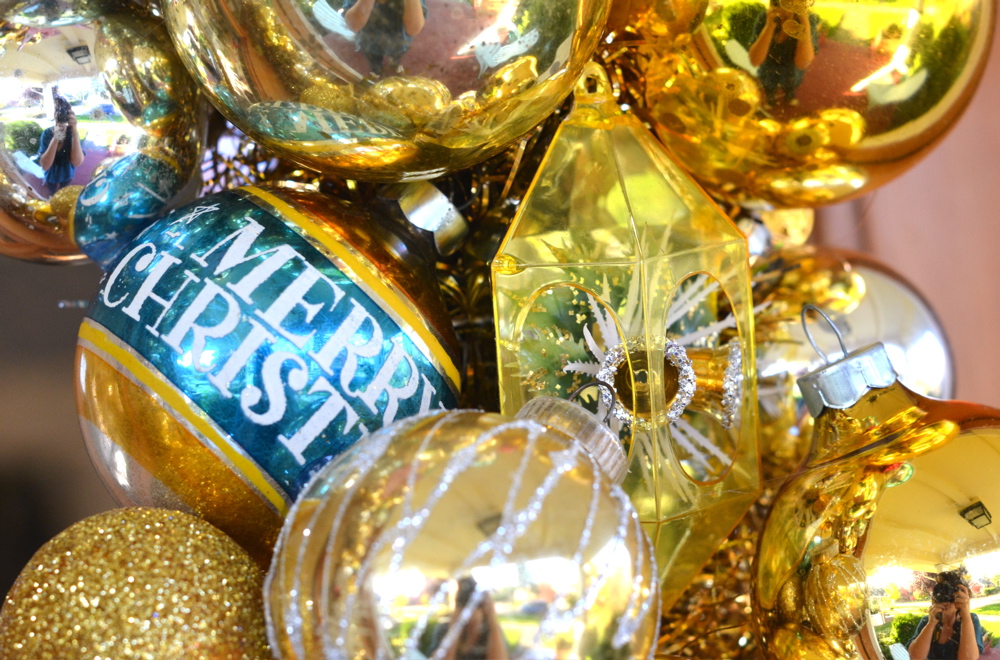
A very merry DIY vintage wreath


I kept seeing these online and thought "I can make that."  Like any craft project, this ornament wreath was a lot more work than I anticipated, but I learned how I could probably speed the process along for the next wreath.


First I started with a large wire wreath form and simply wrapped it in vintage gold tinsel garland. Then I began placing and gluing the glass ornaments with hot glue.  Some took a while to set and not every ornament stuck.  My suggestion is to move fast, use enough glue and be sure where you want to place each piece!


Next time I would start out by lining the outside and inside of the wreath with ornaments first to make it look more uniform.  You could even do a pattern with different colors or shapes.  Then I would fill in the middle and build from there, filling in the nooks and crannies last...

I see me...
It took about twice as many ornaments as I thought it would.  Thank goodness you can find these by the bag for a few dollars at the thrift store.  I'm becoming the Goodwill's best customer this holiday season!


This project is super easy and lots of fun.  Hang it over a mirror or a door.  It would be a great project to work on with an older child or a cautious and careful little one.  Happy Holidays!

9.19.2011

New DIY Project Preview

I've been busy!  The house is covered in glitter now thanks to this week's DIY project spree.  And no, glittering the house was not my DIY.  (But there's a thought...)

Here are three projects you'll see here on the blog over the next few weeks.  Each will have step by step instructions and suggestions for how you might make changes/improvements to your liking.  Be sure to check back!

Big Top Love Chipboard Mini Banner

Crafty Yarn Wrapped Wreath

Glittered and Upgraded Figurine
Our school district is dealing with a strike right now (sigh.  Keep fingers crossed they sort it out soon!) My kids are home with me, which means I work at about a 50% capacity.  But I will do my best to get at least one of these suckers edited and posted for your crafty enjoyment before week's end!  Do you have a preference???

9.13.2011

Prim and Proper Pear and Apple Stuffies DIY

The kids are back in school and I've finally had a moment to breathe and tie up some loose ends, take my first nap in five years, etc.  It also means I had time for a quickie DIY!

Fall is coming.  I can smell it in the air.  While part of me is mourning the loss of a too short summer (the rest of the country had incredible heat - we had incredibly disappointing gray and cold) part of me is itching to start drinking chai and knitwear.

In walking through the neighborhood, I've seen lots of apple and pear trees ripening.  The trees look so rustic.  It inspired me to make these "prim" (short for primitive) little apple and pear pillows.  A quick and easy sewing project using very little material, leaves you with a satisfying way to spruce up for the changing season.


Prim & Proper Pear and Apple Stuffies


You need:
Template drawn on 8.5x11 paper
Scissors and/or rotary cutter and mat
Fabric of choice for front and back of apple/pear
Felt scrap
Matching embroidery thread & needle
Sewing machine and matching thread
Stuffing of choice - use cotton batting, synthetic stuffing, etc.


Draw out the template for apple and pear and cut out.  Don't worry about being too neat or perfect here - the beauty of "prims" is they're supposed to look a bit rustic, so go easy on yourself!  Be gestural with your shape rather than super realistic.  Lay fabric out right sides together and pin template on top.  Cut around template with rotary cutter on rotary mat or with scissors.  Cut out a felt scrap approximately 1 inch x 2 inches (or whatever size looks good to you) for the stem.

Remove template and pin fabric pieces right side together again.  Sew around outside edge leaving 1/4 inch seam allowance, and 2 inch opening at top (where the stem will go.)  Turn and press.  Stuff with stuffing until it reaches desired fullness.


Place felt scrap inside opening and pin closed.  Use embroidery thread to sew opening closed with a cross X stitch (don't worry about making it too neat - remember it's "primitive"!)  You're done!


Variations...

Enlarge template on a copy machine to make a larger pillow

Stuff with corn kernels or beans and use as a door stopper

Embellish with cross stitch embroidery all around the finished seams

Use apple template to make a pumpkin.  Add embroidery detail by using running stitches up the front.

Have fun with this and happy almost Fall!

7.16.2011

More on how to style a "classic" birdcage veil

Tips On How to Style A Classic 9 inch Birdcage/Blusher Veil (like the one shown here in the photo)

9 inch "Classic" style birdcage veil
  • To soften and remove wrinkles, apply light steam or iron on low.  You may also very carefully run the veil under lukewarm water and iron on low when dry.  Veil will hold it’s shape but become more pliable and easy to style.

  • This veil looks great with many different hairstyles and fascinators.  Figure out where you want the veil to sit by positioning the comb in your hair.  If the veil seems to “pop up”, use bobby pins to discreetly tack the veil in place until it’s styled how you want it to look.

  • This style of veil looks great asymmetrically, placed 3-4 inches above the hairline (place it right where your part is if you part your hair to one side.)  It gently sweeps over the eye and gives you a very whimsical, romantic look.  You can also scoot it down a bit towards the ear even for a little more drama.

  • If you have an updo, position the veil at the crown of the head right above the 'do for a classic feel.

  • If you’re wearing a fascinator, position your fascinator on top of the comb after styling the veil.

  • For extra security, use this little trick: comb the veil into a pin curl.  Take a lock of hair and curl it up into a "circle" and pin it to your head using bobby pins to make an "x".  Then slide the comb in against the scalp behind the x.  Your comb will stay extra secure!
If you're looking for one to buy, check out my Etsy shop.  Lots of birdcage style veils to choose from!

6.07.2011

Vintage Fabric Clutch - Quickie DIY

Ahhh.  It feels so good to be using the sewing machine again!  I've been avoiding my stash of fabrics for months now.  Sewing in the cold months is just not as satisfying or enjoyable as sewing in the sunlight with the window open.

Vintage Fabric Clutch - Quickie DIY


I have been longing for a new clutch ever since I saw my friend with one the other night when we went out together - it was cute, turquoise and just the right size for all of her necessities - cash, card, ID, phone and lipstick.  No strap, no fuss, no big purse to carry around all night!


Today I made this little number in about 20 minutes.  It was very easy, quick and satisfying.  I love these vintage fabrics and the little button.  I think mine turned out cuter than my friend's too (but shhhh, don't tell her I told you!!!)  Here's how you do it:

You will need:


  • Two 9x14" rectangles of vintage cotton fabric
  • 9x14" rectangle of light to medium weight interfacing
  • 2x8" fabric scraps
  • Scissor or rotary cutter and mat
  • Pinking shears
  • Sewing machine
  • Needle and thread
  • Vintage button

If you haven't done so already, cut out the 9x14" rectangles of fabric and interfacing.  I chose a brown cotton for the outside and a coordinating cotton print for the inside.


Layer and pin the rectangles in this order - outside fabric right side up, lining fabric right side down, interfacing on top (if you're using the fusible kind, you want to fuse it to the wrong side of the lining fabric before pinning!)

Sew around outside edges with a 3/8" seam allowance, leaving a gap wide enough to turn fabrics along one edge.  Trim corners, turn.  Press, pin and topstitch close to the outside edge, closing gap as you sew.

Gap left for turning

Turn, turn, turn

Fold the piece into thirds lengthwise to form the clutch. Pin and stitch in the ditch along the inside "purse" edges to close (but not the top flap.)

Stitch along the sides to make a "purse"


Cut two 2x8" fabric scraps with pinking shears.  Place wrong sides together, fold a few "ripples" (don't try to be too perfect here!) and tack in place where you want it to sit on the front of your clutch (I used the sewing machine to sew a Z to tack in place.)  Attach a button, brooch or embellishment of choice.


I chose a vintage button...

You're done!  A cute little clutch just in time for summer.  These are so fast and cute - you can whip one up for every day of the week!  ;)


Send me a picture if you make one!  Can't wait to see!

Happy crafting... ;)

6.01.2011

Fabric Harvesting

It's time again for some sewing.  I need a productive, creative outlet that will provide me with something useful, so I've decided to make my kids some summer clothes, and maybe even attempt a little something for myself.  I bought some patterns at Joann's on sale for $1.99 each.  I would have bought these used, but I always seem to have bad luck with used patterns (pieces missing, no directions, wrong size, etc.)

I'm still trying to hold fast to my handmade pledge, so my next stop was the Goodwill.  I looked through and three dresses and a skirt on sale with enough fabric to harvest for the girls clothes.


I saw this shift dress tutorial tweeted by the Martha Stewart Crafts Department, and thought it sounded easy enough.  I think I might give it a go with the skirt fabric.  If it doesn't fit me, I can just alter it a bit for one of my girlies!

So I've got four sewing projects for the week.  Will post some photos when all is said and done!  ;)

5.25.2011

Guest Post DIY and Giveaway at Cornflake Dreams!

This blog is pure loveliness.  The very kind and creative Jillian was so sweet to promote the launch of the magazine and host a giveaway for a DIY veil kit.  She also let me indulge myself in a guest post tutorial for this fun little doily garland!
Photo by Rosemary Photography

Cornflake Dreams is adorable.  Tons of inspiration, ideas, collages (Friday fancies?  Yes please!!!)  So head on over and say hello, enter to win the giveaway and learn how to make this little garland!

5.24.2011

Mason Jar Makeover

I have a problem.  I love jars.  In fact, I can't help but buy jars every time I seem them in the thrift store, antique mall or garage sale.  I don't do a ton of canning or anything - although that's one of my aspirations in life, to become a self-sufficient gardener who cans everything.  And I think I officially have too many.

So I decided I needed to come up with a project for all these jars, and maybe even give some away as gifts (sniff.)  This is what I came up with.
Wouldn't you like to get a fancy jar full of flowers like this one?  I'm pretty sure I wouldn't mind.
I bet they'd also be cute table centerpieces for a garden tea party...

It's super easy.  Here's what you do:

Mason Jar Makeover

You will need:
Pint size mason jar
Glossy Mod Podge
Foam paint brush
Vintage Newsprint, sheet music, book pages, etc.
Ribbon or twine
Directions:
Make sure the mason jar is clean and dry.  Tear the vintage paper into shreds - the size and shapes are entirely up to you.  If they're too big, there will be wrinkles when you adhere them, but that can be charming...

Dip your paint brush into the Mod Podge and paint a little on the jar.  Stick your first shred of paper in place and smooth over the top with your paint brush and more Mod Podge, to get out all the bubbles and wrinkles.  Wipe any excess away with a paper towel, but it should be saturated enough to stick well to the jar.


Continue adhering strips to the jar to cover the main body.  Place strips right up below the lip of the jar.  This part will eventually be covered with ribbon, so don't worry too much about being perfectly even.  Cover the bottom if you like, but I prefer to leave it uncovered.  It won't stick to the table as much that way when all is said and done.

Make sure the paper is stuck well to the jar - use a second coat of Mod Podge if needed.  Let dry.  Tie ribbon, twine, lace, etc. right under the lip of the jar.  Add a tag if you'd like.  Fill with pretty flowers and let somebody know how special they are.

5.17.2011

Feelin' Crafty?

Well I am.  I saw this post via Goodwill's Tumblr for a Vintage Tray Memo Board, originally posted at Campfire Chic by guest poster Brook Ann from On The Wings of a Dove.  Me likey.

Vintage Tray Memo Board
I have a large metal tray with all sorts of flowery things on it just waiting to be crafted into something more spectacular.  It's no good letting it just sit in the cupboard.  I'm liberating myself from veil making for a while, so this is the perfect project to free my inner craftress!

4.18.2011

LOVE foil tags - DIY project to dress up your window sill

The photo shoot yesterday was awesome!  So many creative women working together to create beauty.  I can't wait to show you what's in store for the zine.

I came across this project over at Charcoal & Crayons and fell in love with her little BLOOM tags!  It's such a creative use of materials, and would make adorable, affordable table centerpieces at a wedding! 

I contacted Andrea to see if we could include the DIY in the wedding zine.  I was so inspired, that while I was waiting to hear back I decided to have a go at making some tags, but with some different materials.  I decided it was time to use the copper foil that's been sitting in my drawer for about three years.

I'm pleased to announce that I'll be including Andrea's project in the zine (yay!) 

I thought I would share my project inspired by Andrea's here.  Just to warn you, copper foil is kind of dangerous to work with because it's so sharp!  So please exercise caution.
LOVE foil tags


You will need:

Foil sheet kit with stylus tools, such as ArtEmboss (available at craft stores)
Cheap Scissors - the good ones will get dull with this project!
Xacto knife
Rotary cutter with pinking edge or scalloped edge scissors
Rotary mat or scrap of cardboard
Baling twine (don't forget your wire clippers) or baker's twine
4 small Orangina bottles, labels removed, or small vases of your choosing

Cut 1 to 2 inch squares from the foil sheet using your cheap scissors.

Next, use the rotary tool or scalloped edge scissors to trim away along the edges.  Be careful - the foil bits are very sharp.  I had a few get stuck to my fingers and now see that they nicked the skin.
 Now, on a piece of cardboard or your rotary mat, take your metal tip stylus and trace the a letter onto each of the foil pieces.
Trace over the letters with the wood tip stylus (a bit thicker tip.)  You might have to do this a few times and press fairly hard.  Turn the piece over to see how it looks to decide how much to do it.

Embellish how you wish using your styluses - I just did little dots with the metal tool along the edges!
 At the center top of the front of each letter (you'll be poking through front to back), use your Xacto knife to carve a little hole by pressing and twisting the knife until it punches through to the mat or cardboard underneath.  Please be really careful when doing this!!!  The hole doesn't have to be very big, just large enough to fit the twine through.


Cut a length of twine about 4 inches long.  Thread through the hole and tie at the top of the tag in a little knot.  Wrap around the neck of the Orangina bottle or vase and tie in a neat bow if using bakers twine, twist and clip to desired length if using baling twine.

Fill with water and flowers!  Make sure you check your spelling.  ;)


A little extra tip - to get the labels off the Orangina bottles easier, soak them in hot water for a minute or two and the label and glue will come off much easier!

Some more ideas!  You could also do one for initials (J+K for example), Spring, your child's name, your cat's name, something romantic in French (ooh la la) or whatever else you can think up.  Happy crafting!

Chic on a Shoestring Decorating

UndertheTableandDreaming