
Showing posts with label craft project. Show all posts
Showing posts with label craft project. Show all posts
11.07.2011
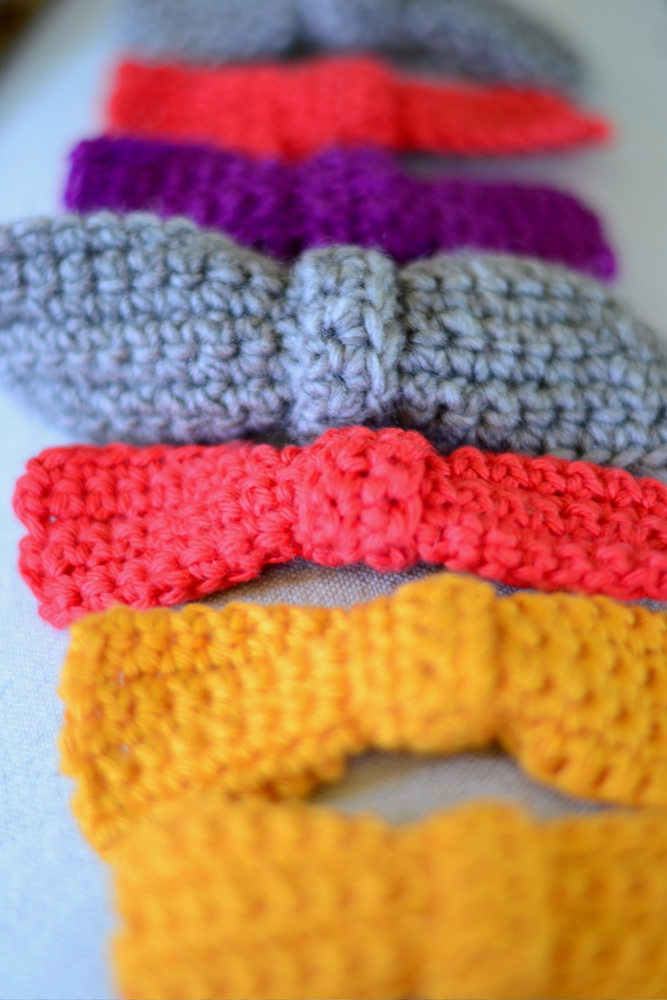
What to do with these...
... gorgeous crocheted bows? They were going to be hair accessories but ended up feeling too bulky. They're about 1.5 to 2 inches wide and 3-4 inches long. I thought about a garland (have about 8 or 10), but could maybe adorn multiple items with the bows... Ideas and suggestions are most appreciated! :)


9.22.2011
Grown Up DIY Yarn Wreath Project
Yarn wreaths are one of those vintage gems that when I come across in the thrift store, I'm immediately transported back to the days of bubble lights and tinsel covered trees. Typically covered in a cheap sheen of red, green and white, to this day there's something about the look and feel of acrylic yarn that reminds me of childhood Christmases and happy times.
One of the things I love about this "nostalgia movement" amongst crafters is that folks are taking the old and sentimental, giving it a swift kick in the pants, and creating handmade items that are relevant to today's style with nicer materials, cool colors and often times and unexpected artistic flair.
So when I started seeing yarn wreaths all over Etsy, Pinterest, magazines, blogs, etc. I wasn't surprised, I was excited! What a great nod to my childhood. And not just for holidays! I thought "this, THIS I CAN DO!" And now you can too. I'll show you how easy it is.*
*This project does takes a couple/few hours so be ready with a pot of tea and some Desperate Housewives reruns queued up... :)


You'll need:
Foam wreath blank in size of choice
2-3 skeins of yarn in weight of choice (I used acrylic/wool blend in worsted weight)
yarn pom poms
3 foot length of coordinating yarn for stripes
lace scraps
vintage buttons
ribbon scraps
Coordinating rick rack (I used large width)
Hot glue gun & glue

Fire up the glue gun and glue the end of your chosen yarn to the top back of the wreath (you choose where the top should be.) Wait for the glue to dry a bit so the yarn with hold steady while you wrap. Begin wrapping by holding the ball of yarn firmly and circling around the wreath tube 5 or 6 times, keeping the yarn somewhat taught while you wrap. Maintain tension while you slide the loops toward the center, keeping them from overlapping, but pressed close together.


(Here is where you want to get comfortable and press play on Netflix.)
Keep wrapping and wrapping and wrapping and sliding the loops together in this same manner. If you need to take a break, use a straight pin to hold the yarn in place and maintain tension. make sure your loops don't overlap - smooth them out as you go, making sure they stay tight together.
If/when you reach the end of a skein, hot glue the end on the BACK side of the wreath. Make sure all your loops look uniform (smooth out any overlaps, slide loops closer together if needed) before you glue! Start another skein by gluing the new yarn end right where you left off.

If you come across any knots in the yarn, trim the yarn before the knot so that you can glue the end to the back of the wreath. Cut away the knot, glue the fresh end and start wrapping again.
When you have wrapped to cover the entire wreath, glue end to the back next to where you started. Be sure to pat yourself on the back! That took forever...
Take the length of coordinating yarn (I used a gray wool yarn scrap) and glue to the top back again. When dried a bit, wrap around in a large diagonal loop keeping even space between loops. These can be as far apart or as close together as you like! Glue end to secure at the top back when finished wrapping. You can wrap around again if you like to create an X effect, just go the opposite direction!

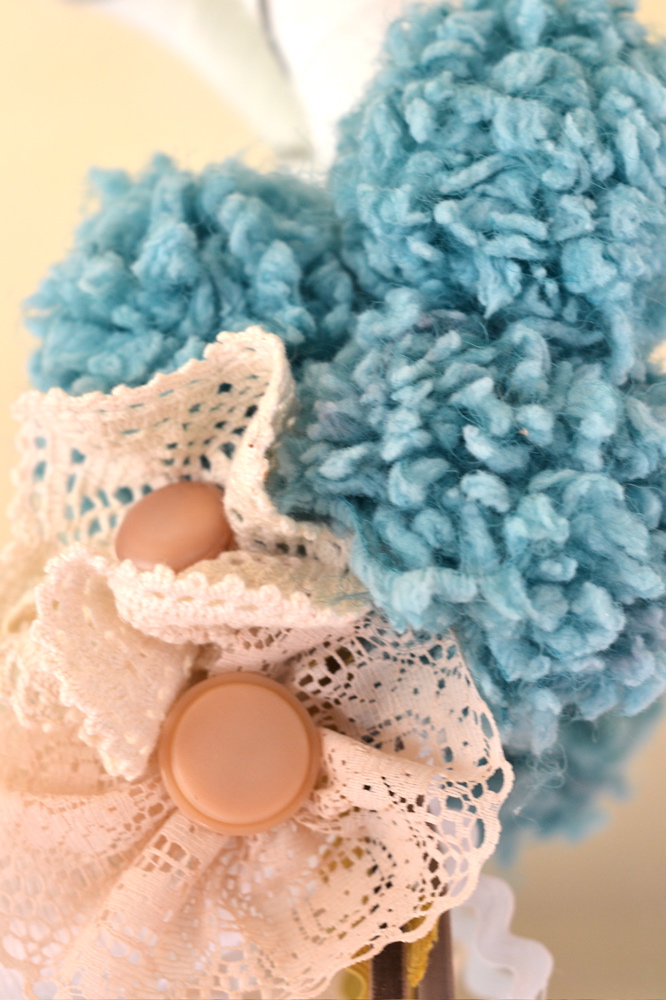
Now onto the pom poms. I happened to have three fuzzy poms on hand left over from a project last year. Google "yarn pom poms" if you need a pattern, they are fairly easy to make, or you can find pom pom makers at the craft store in the yarn section. Glue the pom poms to the front with the glue gun, tight together in a group of three.

Lace scraps can be bunched into a flower shape, or you can sew a running stitch on one side and pull to create a flower. I made a bunchy flower with a cotton lace doily simply by gluing it into a flower shape (careful here - the glue is hot!!!) right onto the wreath and glued the sewn lace flower right below it. Vintage buttons were glued to their centers, and a few scraps of rick rack and ribbon were glued behind the flowers to hang down a bit as an accent.

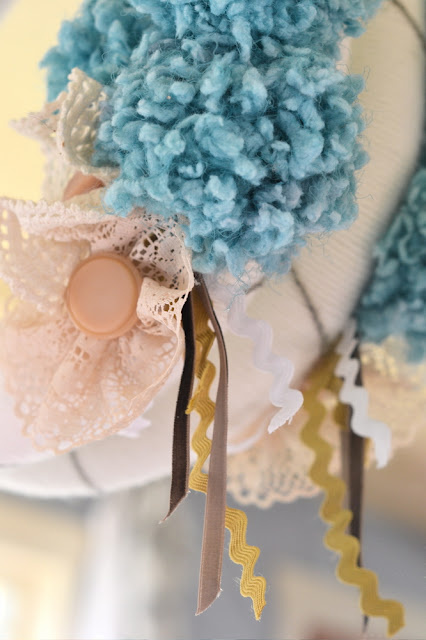
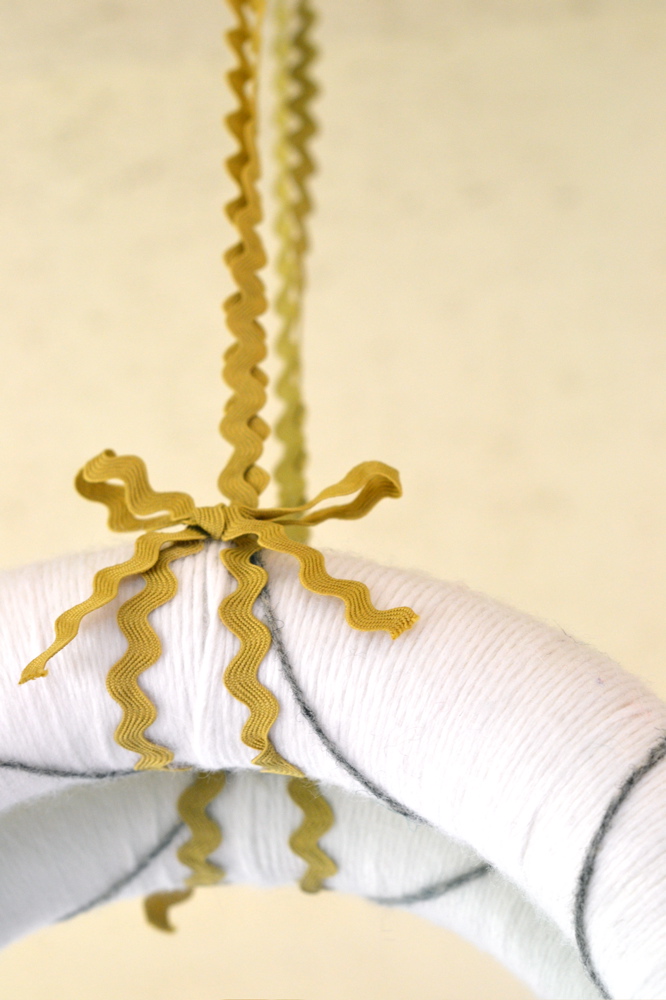
Rick rack was used as a wreath hanger by looping both end through the top of the wreath and trimming to desired length. I made a little bow with the leftovers and glued it to the top of the loop on the wreath.


Ideas:
Use different shades of yarn to "color block" a wreath!
Use two strands together (advanced maneuver!) to create more texture
Use felt balls, felt flowers, knitted/crocheted flowers, leaves, twigs, birds nests, etc. instead of pom poms! I bet you could think up some amazing seasonal themes...
Have fun!

One of the things I love about this "nostalgia movement" amongst crafters is that folks are taking the old and sentimental, giving it a swift kick in the pants, and creating handmade items that are relevant to today's style with nicer materials, cool colors and often times and unexpected artistic flair.
So when I started seeing yarn wreaths all over Etsy, Pinterest, magazines, blogs, etc. I wasn't surprised, I was excited! What a great nod to my childhood. And not just for holidays! I thought "this, THIS I CAN DO!" And now you can too. I'll show you how easy it is.*
*This project does takes a couple/few hours so be ready with a pot of tea and some Desperate Housewives reruns queued up... :)
Grown Up DIY Yarn Wreath


You'll need:
Foam wreath blank in size of choice
2-3 skeins of yarn in weight of choice (I used acrylic/wool blend in worsted weight)
yarn pom poms
3 foot length of coordinating yarn for stripes
lace scraps
vintage buttons
ribbon scraps
Coordinating rick rack (I used large width)
Hot glue gun & glue

Fire up the glue gun and glue the end of your chosen yarn to the top back of the wreath (you choose where the top should be.) Wait for the glue to dry a bit so the yarn with hold steady while you wrap. Begin wrapping by holding the ball of yarn firmly and circling around the wreath tube 5 or 6 times, keeping the yarn somewhat taught while you wrap. Maintain tension while you slide the loops toward the center, keeping them from overlapping, but pressed close together.


(Here is where you want to get comfortable and press play on Netflix.)
Keep wrapping and wrapping and wrapping and sliding the loops together in this same manner. If you need to take a break, use a straight pin to hold the yarn in place and maintain tension. make sure your loops don't overlap - smooth them out as you go, making sure they stay tight together.
If/when you reach the end of a skein, hot glue the end on the BACK side of the wreath. Make sure all your loops look uniform (smooth out any overlaps, slide loops closer together if needed) before you glue! Start another skein by gluing the new yarn end right where you left off.

If you come across any knots in the yarn, trim the yarn before the knot so that you can glue the end to the back of the wreath. Cut away the knot, glue the fresh end and start wrapping again.
When you have wrapped to cover the entire wreath, glue end to the back next to where you started. Be sure to pat yourself on the back! That took forever...
Take the length of coordinating yarn (I used a gray wool yarn scrap) and glue to the top back again. When dried a bit, wrap around in a large diagonal loop keeping even space between loops. These can be as far apart or as close together as you like! Glue end to secure at the top back when finished wrapping. You can wrap around again if you like to create an X effect, just go the opposite direction!

Now onto the pom poms. I happened to have three fuzzy poms on hand left over from a project last year. Google "yarn pom poms" if you need a pattern, they are fairly easy to make, or you can find pom pom makers at the craft store in the yarn section. Glue the pom poms to the front with the glue gun, tight together in a group of three.

Lace scraps can be bunched into a flower shape, or you can sew a running stitch on one side and pull to create a flower. I made a bunchy flower with a cotton lace doily simply by gluing it into a flower shape (careful here - the glue is hot!!!) right onto the wreath and glued the sewn lace flower right below it. Vintage buttons were glued to their centers, and a few scraps of rick rack and ribbon were glued behind the flowers to hang down a bit as an accent.

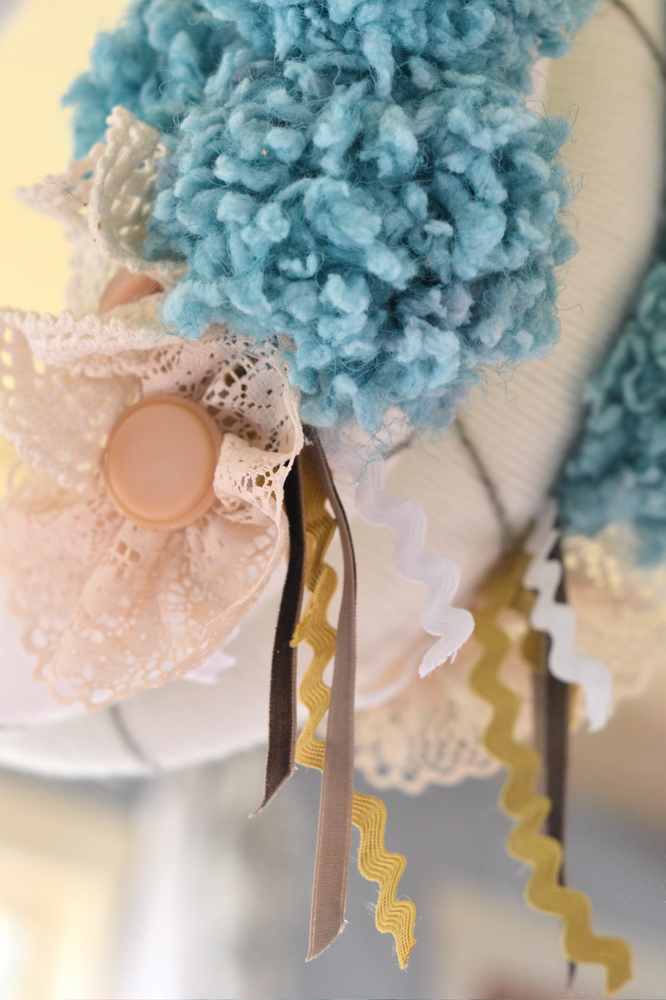
Rick rack was used as a wreath hanger by looping both end through the top of the wreath and trimming to desired length. I made a little bow with the leftovers and glued it to the top of the loop on the wreath.

Ideas:
Use different shades of yarn to "color block" a wreath!
Use two strands together (advanced maneuver!) to create more texture
Use felt balls, felt flowers, knitted/crocheted flowers, leaves, twigs, birds nests, etc. instead of pom poms! I bet you could think up some amazing seasonal themes...
Have fun!
9.19.2011
New DIY Project Preview
I've been busy! The house is covered in glitter now thanks to this week's DIY project spree. And no, glittering the house was not my DIY. (But there's a thought...)
Here are three projects you'll see here on the blog over the next few weeks. Each will have step by step instructions and suggestions for how you might make changes/improvements to your liking. Be sure to check back!
Our school district is dealing with a strike right now (sigh. Keep fingers crossed they sort it out soon!) My kids are home with me, which means I work at about a 50% capacity. But I will do my best to get at least one of these suckers edited and posted for your crafty enjoyment before week's end! Do you have a preference???
Here are three projects you'll see here on the blog over the next few weeks. Each will have step by step instructions and suggestions for how you might make changes/improvements to your liking. Be sure to check back!
 |
| Big Top Love Chipboard Mini Banner |
 |
| Crafty Yarn Wrapped Wreath |
 |
| Glittered and Upgraded Figurine |
9.13.2011
Prim and Proper Pear and Apple Stuffies DIY
The kids are back in school and I've finally had a moment to breathe and tie up some loose ends, take my first nap in five years, etc. It also means I had time for a quickie DIY!
Fall is coming. I can smell it in the air. While part of me is mourning the loss of a too short summer (the rest of the country had incredible heat - we had incredibly disappointing gray and cold) part of me is itching to start drinking chai and knitwear.
In walking through the neighborhood, I've seen lots of apple and pear trees ripening. The trees look so rustic. It inspired me to make these "prim" (short for primitive) little apple and pear pillows. A quick and easy sewing project using very little material, leaves you with a satisfying way to spruce up for the changing season.
You need:
Template drawn on 8.5x11 paper
Scissors and/or rotary cutter and mat
Fabric of choice for front and back of apple/pear
Felt scrap
Matching embroidery thread & needle
Sewing machine and matching thread
Stuffing of choice - use cotton batting, synthetic stuffing, etc.


Draw out the template for apple and pear and cut out. Don't worry about being too neat or perfect here - the beauty of "prims" is they're supposed to look a bit rustic, so go easy on yourself! Be gestural with your shape rather than super realistic. Lay fabric out right sides together and pin template on top. Cut around template with rotary cutter on rotary mat or with scissors. Cut out a felt scrap approximately 1 inch x 2 inches (or whatever size looks good to you) for the stem.

Remove template and pin fabric pieces right side together again. Sew around outside edge leaving 1/4 inch seam allowance, and 2 inch opening at top (where the stem will go.) Turn and press. Stuff with stuffing until it reaches desired fullness.


Place felt scrap inside opening and pin closed. Use embroidery thread to sew opening closed with a cross X stitch (don't worry about making it too neat - remember it's "primitive"!) You're done!


Variations...
Enlarge template on a copy machine to make a larger pillow
Stuff with corn kernels or beans and use as a door stopper
Embellish with cross stitch embroidery all around the finished seams
Use apple template to make a pumpkin. Add embroidery detail by using running stitches up the front.
Have fun with this and happy almost Fall!
Fall is coming. I can smell it in the air. While part of me is mourning the loss of a too short summer (the rest of the country had incredible heat - we had incredibly disappointing gray and cold) part of me is itching to start drinking chai and knitwear.
In walking through the neighborhood, I've seen lots of apple and pear trees ripening. The trees look so rustic. It inspired me to make these "prim" (short for primitive) little apple and pear pillows. A quick and easy sewing project using very little material, leaves you with a satisfying way to spruce up for the changing season.
Prim & Proper Pear and Apple Stuffies


You need:
Template drawn on 8.5x11 paper
Scissors and/or rotary cutter and mat
Fabric of choice for front and back of apple/pear
Felt scrap
Matching embroidery thread & needle
Sewing machine and matching thread
Stuffing of choice - use cotton batting, synthetic stuffing, etc.


Draw out the template for apple and pear and cut out. Don't worry about being too neat or perfect here - the beauty of "prims" is they're supposed to look a bit rustic, so go easy on yourself! Be gestural with your shape rather than super realistic. Lay fabric out right sides together and pin template on top. Cut around template with rotary cutter on rotary mat or with scissors. Cut out a felt scrap approximately 1 inch x 2 inches (or whatever size looks good to you) for the stem.

Remove template and pin fabric pieces right side together again. Sew around outside edge leaving 1/4 inch seam allowance, and 2 inch opening at top (where the stem will go.) Turn and press. Stuff with stuffing until it reaches desired fullness.


Place felt scrap inside opening and pin closed. Use embroidery thread to sew opening closed with a cross X stitch (don't worry about making it too neat - remember it's "primitive"!) You're done!


Variations...
Enlarge template on a copy machine to make a larger pillow
Stuff with corn kernels or beans and use as a door stopper
Embellish with cross stitch embroidery all around the finished seams
Use apple template to make a pumpkin. Add embroidery detail by using running stitches up the front.
Have fun with this and happy almost Fall!
6.07.2011
Vintage Fabric Clutch - Quickie DIY
Ahhh. It feels so good to be using the sewing machine again! I've been avoiding my stash of fabrics for months now. Sewing in the cold months is just not as satisfying or enjoyable as sewing in the sunlight with the window open.

I have been longing for a new clutch ever since I saw my friend with one the other night when we went out together - it was cute, turquoise and just the right size for all of her necessities - cash, card, ID, phone and lipstick. No strap, no fuss, no big purse to carry around all night!

Today I made this little number in about 20 minutes. It was very easy, quick and satisfying. I love these vintage fabrics and the little button. I think mine turned out cuter than my friend's too (but shhhh, don't tell her I told you!!!) Here's how you do it:
You will need:

If you haven't done so already, cut out the 9x14" rectangles of fabric and interfacing. I chose a brown cotton for the outside and a coordinating cotton print for the inside.

Layer and pin the rectangles in this order - outside fabric right side up, lining fabric right side down, interfacing on top (if you're using the fusible kind, you want to fuse it to the wrong side of the lining fabric before pinning!)
Sew around outside edges with a 3/8" seam allowance, leaving a gap wide enough to turn fabrics along one edge. Trim corners, turn. Press, pin and topstitch close to the outside edge, closing gap as you sew.
Fold the piece into thirds lengthwise to form the clutch. Pin and stitch in the ditch along the inside "purse" edges to close (but not the top flap.)

Cut two 2x8" fabric scraps with pinking shears. Place wrong sides together, fold a few "ripples" (don't try to be too perfect here!) and tack in place where you want it to sit on the front of your clutch (I used the sewing machine to sew a Z to tack in place.) Attach a button, brooch or embellishment of choice.

You're done! A cute little clutch just in time for summer. These are so fast and cute - you can whip one up for every day of the week! ;)


Send me a picture if you make one! Can't wait to see!
Happy crafting... ;)
Vintage Fabric Clutch - Quickie DIY

I have been longing for a new clutch ever since I saw my friend with one the other night when we went out together - it was cute, turquoise and just the right size for all of her necessities - cash, card, ID, phone and lipstick. No strap, no fuss, no big purse to carry around all night!

Today I made this little number in about 20 minutes. It was very easy, quick and satisfying. I love these vintage fabrics and the little button. I think mine turned out cuter than my friend's too (but shhhh, don't tell her I told you!!!) Here's how you do it:
You will need:
- Two 9x14" rectangles of vintage cotton fabric
- 9x14" rectangle of light to medium weight interfacing
- 2x8" fabric scraps
- Scissor or rotary cutter and mat
- Pinking shears
- Sewing machine
- Needle and thread
- Vintage button

If you haven't done so already, cut out the 9x14" rectangles of fabric and interfacing. I chose a brown cotton for the outside and a coordinating cotton print for the inside.

Layer and pin the rectangles in this order - outside fabric right side up, lining fabric right side down, interfacing on top (if you're using the fusible kind, you want to fuse it to the wrong side of the lining fabric before pinning!)
Sew around outside edges with a 3/8" seam allowance, leaving a gap wide enough to turn fabrics along one edge. Trim corners, turn. Press, pin and topstitch close to the outside edge, closing gap as you sew.
 |
| Gap left for turning |
 |
| Turn, turn, turn |
Fold the piece into thirds lengthwise to form the clutch. Pin and stitch in the ditch along the inside "purse" edges to close (but not the top flap.)
 |
| Stitch along the sides to make a "purse" |

Cut two 2x8" fabric scraps with pinking shears. Place wrong sides together, fold a few "ripples" (don't try to be too perfect here!) and tack in place where you want it to sit on the front of your clutch (I used the sewing machine to sew a Z to tack in place.) Attach a button, brooch or embellishment of choice.

 |
| I chose a vintage button... |
You're done! A cute little clutch just in time for summer. These are so fast and cute - you can whip one up for every day of the week! ;)


Send me a picture if you make one! Can't wait to see!
Happy crafting... ;)
5.24.2011
Mason Jar Makeover
I have a problem. I love jars. In fact, I can't help but buy jars every time I seem them in the thrift store, antique mall or garage sale. I don't do a ton of canning or anything - although that's one of my aspirations in life, to become a self-sufficient gardener who cans everything. And I think I officially have too many.
So I decided I needed to come up with a project for all these jars, and maybe even give some away as gifts (sniff.) This is what I came up with.
 Wouldn't you like to get a fancy jar full of flowers like this one? I'm pretty sure I wouldn't mind.
 I bet they'd also be cute table centerpieces for a garden tea party...
It's super easy. Here's what you do:

Dip your paint brush into the Mod Podge and paint a little on the jar. Stick your first shred of paper in place and smooth over the top with your paint brush and more Mod Podge, to get out all the bubbles and wrinkles. Wipe any excess away with a paper towel, but it should be saturated enough to stick well to the jar.


Continue adhering strips to the jar to cover the main body. Place strips right up below the lip of the jar. This part will eventually be covered with ribbon, so don't worry too much about being perfectly even. Cover the bottom if you like, but I prefer to leave it uncovered. It won't stick to the table as much that way when all is said and done.
Make sure the paper is stuck well to the jar - use a second coat of Mod Podge if needed. Let dry. Tie ribbon, twine, lace, etc. right under the lip of the jar. Add a tag if you'd like. Fill with pretty flowers and let somebody know how special they are.


So I decided I needed to come up with a project for all these jars, and maybe even give some away as gifts (sniff.) This is what I came up with.


It's super easy. Here's what you do:
Mason Jar Makeover
You will need:
Pint size mason jar
Glossy Mod Podge
Foam paint brush
Vintage Newsprint, sheet music, book pages, etc.
Ribbon or twine

Directions:
Make sure the mason jar is clean and dry. Tear the vintage paper into shreds - the size and shapes are entirely up to you. If they're too big, there will be wrinkles when you adhere them, but that can be charming...Dip your paint brush into the Mod Podge and paint a little on the jar. Stick your first shred of paper in place and smooth over the top with your paint brush and more Mod Podge, to get out all the bubbles and wrinkles. Wipe any excess away with a paper towel, but it should be saturated enough to stick well to the jar.


Continue adhering strips to the jar to cover the main body. Place strips right up below the lip of the jar. This part will eventually be covered with ribbon, so don't worry too much about being perfectly even. Cover the bottom if you like, but I prefer to leave it uncovered. It won't stick to the table as much that way when all is said and done.
Make sure the paper is stuck well to the jar - use a second coat of Mod Podge if needed. Let dry. Tie ribbon, twine, lace, etc. right under the lip of the jar. Add a tag if you'd like. Fill with pretty flowers and let somebody know how special they are.


5.17.2011
Feelin' Crafty?
Well I am. I saw this post via Goodwill's Tumblr for a Vintage Tray Memo Board, originally posted at Campfire Chic by guest poster Brook Ann from On The Wings of a Dove. Me likey.
I have a large metal tray with all sorts of flowery things on it just waiting to be crafted into something more spectacular. It's no good letting it just sit in the cupboard. I'm liberating myself from veil making for a while, so this is the perfect project to free my inner craftress!
 |
| Vintage Tray Memo Board |
Subscribe to:
Posts (Atom)