Showing posts with label bride. Show all posts

7.16.2011

More on how to style a "classic" birdcage veil

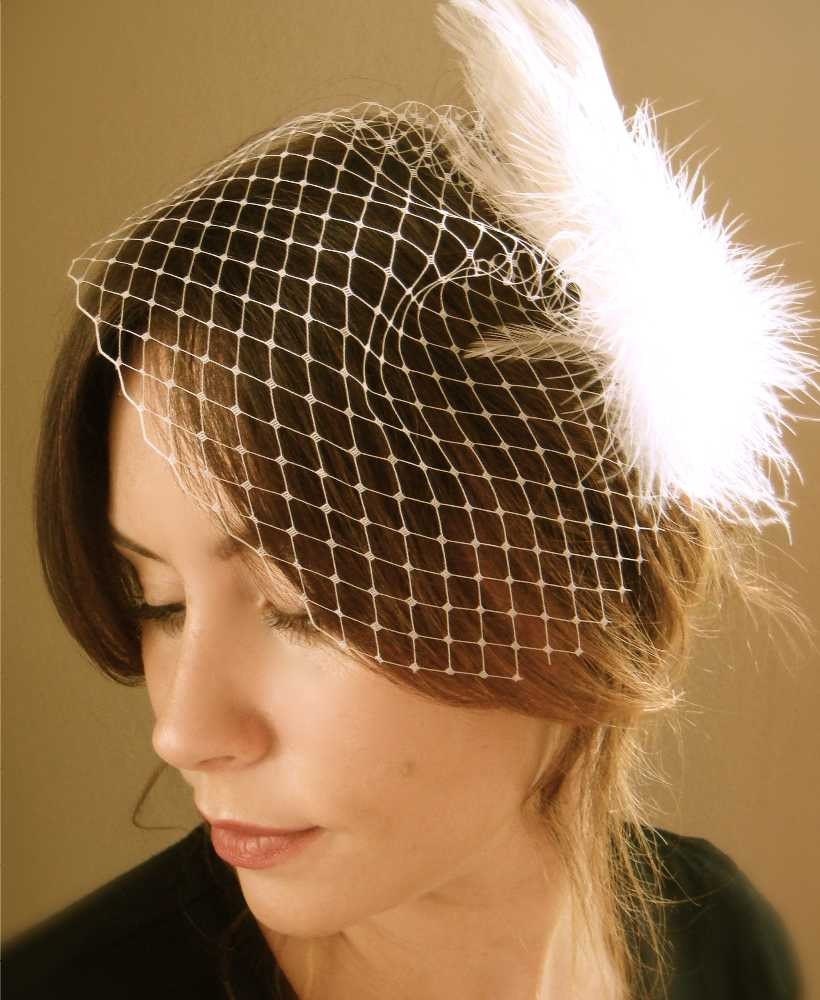
Tips On How to Style A Classic 9 inch Birdcage/Blusher Veil (like the one shown here in the photo)

9 inch "Classic" style birdcage veil
  • To soften and remove wrinkles, apply light steam or iron on low.  You may also very carefully run the veil under lukewarm water and iron on low when dry.  Veil will hold it’s shape but become more pliable and easy to style.

  • This veil looks great with many different hairstyles and fascinators.  Figure out where you want the veil to sit by positioning the comb in your hair.  If the veil seems to “pop up”, use bobby pins to discreetly tack the veil in place until it’s styled how you want it to look.

  • This style of veil looks great asymmetrically, placed 3-4 inches above the hairline (place it right where your part is if you part your hair to one side.)  It gently sweeps over the eye and gives you a very whimsical, romantic look.  You can also scoot it down a bit towards the ear even for a little more drama.

  • If you have an updo, position the veil at the crown of the head right above the 'do for a classic feel.

  • If you’re wearing a fascinator, position your fascinator on top of the comb after styling the veil.

  • For extra security, use this little trick: comb the veil into a pin curl.  Take a lock of hair and curl it up into a "circle" and pin it to your head using bobby pins to make an "x".  Then slide the comb in against the scalp behind the x.  Your comb will stay extra secure!
If you're looking for one to buy, check out my Etsy shop.  Lots of birdcage style veils to choose from!

6.14.2011

Real Wedding - Sara in a vintage style headband

Every once in a while I get a very special email from a bride who shares her photos with me.  It makes me cry every time!  The best part about my little veil and fascinator shop is knowing I get to make someone feel extra special on their wedding day with a handmade piece.

Sara chose this piece for her wedding day


Very elegant yet very simple.  Her look was customized with a vintage blue rhinestone brooch.  It was one that I painstakingly replaced some of the jewels in to bring it back to life!  Gotta love handmade... ;)

Here are a couple more shots of her looking gorgeous.  Thanks Fort Mill Photography for the use of your lovely photos.


Congrats Sara!  Thanks so much for sharing!

5.15.2011

It's All In The Details... Online Magazine For A Handmade Wedding

It's finally here!  Enjoy!


1.20.2011

Upcoming Classes


Hey all you crafty brides!!!  Two exciting events to announce!  I'll be offering two Do It Yourself Bride classes to make your own custom birdcage veil and fascinator in coming months at Pacific Fabrics in Puyallup, WA.


March 19, 2011 from 10 AM - 12 PM
April 23, 2011 from 10 AM - 12 PM

Use handsewing techniques to create a simple, yet beautiful detachable 9-inch birdcage veil and custom feather fascinator using materials like vintage brooches, Czech glass pearl beads, lace, etc.  The cost is $16 to register (visit the Pacific Fabrics website to do so), plus materials.  A list will be provided to you upon registration, and pretty much all the materials are available right there at Pacific Fabrics, with the exception of any vintage elements you choose to incorporate, to create a white and ivory fascinator/veil combo.  A fabulous deal!!!

Join me!  I'd love to see you there!  :)

1.13.2011

A lovely day and a giveaway!

Today I woke up with the idea in my head that today would be a good day.  It's only 11 AM, and I've already faced a few challenges, but I'm determined!

One of the great parts about today is this sweet little blog feature over at Souris Mariage, a fun to read wedding blog full of great photos and ideas.


AND, they are hosting a giveaway for the veil of your choice!  So go on over and check it out, leave a comment and enter to win.  You could be wearing one of these pretty babies on your wedding day!


11.01.2010

Fall Hair Decor Tutorial - Making feather pads for fascinators

So I thought I'd share a little tutorial for anyone out there who wants to try their hand at making a hair accessory lovingly referred to as a "Fascinator."  This easy project is perfect for DIY weddings - make hair pieces for your bridesmaids to wear!  They're certainly cute enough to wear again!

It's very easy, and about as time consuming as a trip to the craft store.  The total cost of materials, assuming you don't have any of these items on hand at home, would be around $10-15, with the biggest cost being the glue, which you can use again and again and again!  You'll also have materials left over, so you could ideally make at least 4 of these.

Materials needed:


  • Scrap of wool felt (felt with actual wool content works the best for me.  I like National Nonwoven's, with at least 30% wool fiber content)
  • 20-30 pheasant ringneck feathers (or whatever feathers you like.  Black and white dot guinea fowl also looks fantastic!  Tons of feathers for sale on Etsy - do a search under "supplies")
  • small metal alligator clip
  • A strong, flexible glue - hot glue works pretty good, but you might consider E6000 for long term use

The first step is to cut an oval of felt.  Really, more of an egg shape.  I usually cut mine around 2" wide and 3" inches in length.

Next, strip the feathers.  All you do is simply hold the spine of the feather in one hand, and grab the downy feathers and pull them down the spine toward the bottom.   Be somewhat gentle, or the spine might break!


Clip the spine to the desired length, and voila.  I usually start at the top of the felt egg and leave the spines a bit longer, and as I get closer to the bottom, I trim them up to where the pretty, smooth feather starts.  The feathers will vary at bit in size, and I generally start with the larger feathers at the top and graduate the size with the smallest at the bottom.  Because I do a million of these a day, I organize by feather pattern (some are more circular, some are more narrow with vertical lines) and size so I can work fast.

When you're ready, take up your glue and draw a line across the larger end of the felt egg.  Place your feathers across the top like so:


Continue layering like this, and sort of "round out the edges" - place the outside feathers at a slight angle and work toward the center and down, graduating the number of feathers in the row as you reach the bottom.  Sorry I didn't take a picture of this, but you'll get the idea from the picture of the finished product below.


When your glue dries a bit, flip it over and this is what you'll see:


So now you want to attach your small metal alligator clip.  I like the kind with two little prongs (like I always imagine there might be in an old school beauty shop when someone is having their hair done up in curls.)  You can cover the clip with a nice bit of ribbon first, or not.  Whatever you prefer.

Simply place and glue!

Oooooh, zebra surprise!

 When you're finished, you can embellish with cute buttons, vintage findings, silk flowers, or just about anything you can think of!  Here's a couple I did this afternoon:


Get creative and try different types of feathers.  You can also attach the feather pad to a headband.

If you like this tutorial, please follow my blog!  There will be more tutorials to come, including DIY wedding projects, restoring vintage hats, crafting handmade flowers, etc.

Happy crafting!